Table of Contents Link to heading
- Why Git LFS for Visual Testing?
- Working example
- Benefits of Version-Controlled Screenshots
- Setup Instructions
- Building and Running Playwright in Docker
- Pull Request example
- Screenshot Management Strategy
- Best Practices
- Common Issues and Solutions
- Conclusion
Playwright Visual Tests with GIT-LFS and Docker Link to heading
While working on various projects, I struggled to find a good solution for managing golden screenshots in Playwright — so I decided to share my approach, hoping it helps others facing the same challenge! All examples and source code are available here. I assume you are familiar with Playwright, Git and Docker.
This guide explains how to set up and use Git Large File Storage (LFS) to efficiently manage golden/baseline screenshots in your Playwright visual testing workflow. Additionally, it provides a Docker-based solution for generating consistent golden screenshots across different platforms, ensuring reliable visual testing in CI environments.
Working Example Link to heading
You can find a complete, ready-to-use example repository here: pajdekPL/playwright-git-lfs
The repository contains a full setup, Docker scripts, and more advanced examples for managing Playwright visual regression tests with Git LFS and Docker.
Why Git LFS for Visual Testing? Link to heading
When performing visual testing with Playwright, you need to store baseline (golden) screenshots to compare against during test runs. These image files can quickly increase your repository size. Git LFS helps by:
- Storing large files outside of regular Git
- Replacing image files with lightweight pointers in your Git repository
- Improving repository clone and pull times
- Making it more efficient to work with binary files
Benefits of Version-Controlled Screenshots Link to heading
Keeping screenshots in your repository (via Git LFS) provides several key advantages:
- Team Collaboration: Team members can review and approve visual changes through standard Git workflows
- Change History: Track the evolution of your UI over time with full history of visual changes
- Code Review Integration: Review visual changes alongside code changes in pull requests
- Accountability: Know who made specific visual changes and when they were made
- Rollback Capability: Easily revert to previous versions of screenshots if needed
- CI/CD Integration: Automated visual testing in CI/CD pipelines with consistent baselines
Setup Instructions Link to heading
1. Install Git LFS Link to heading
macOS (using Homebrew):
brew install git-lfs
# Initialize Git LFS
git lfs install
For other platforms, refer to the official Git LFS documentation: https://git-lfs.com
2. Configure Git LFS for Screenshots Link to heading
Create a .gitattributes file in your repository root and specify which files should be tracked by Git LFS:
tests/**/*.png filter=lfs diff=lfs merge=lfs -text
3. Set up Playwright Visual Testing Link to heading
In your Playwright configuration (playwright.config.ts), configure the screenshots directory:
export default defineConfig({
  testDir: "./tests",
  snapshotDir: "./screenshots",
  // rest of your Playwright config
});
Creating Baseline Screenshots Link to heading
- Write your visual test:
import { test, expect } from "@playwright/test";

test("homepage visual test", async ({ page }) => {
  await page.goto("https://your-website.com");
  await expect(page).toHaveScreenshot("homepage.png");
});
- Generate baseline screenshots:
npx playwright test --update-snapshots
- Track new screenshots with Git LFS:
git add tests/screenshots
git commit -m "Add baseline screenshots"
git push
Running Visual Tests Link to heading
Regular test runs will compare against the baseline images:
npx playwright test
Building and Running Playwright in Docker Link to heading
Most CI environments run on Linux machines, so it’s important to maintain Linux-specific screenshots for consistent visual testing. If you’re developing on macOS, you’ll need to generate the Linux screenshots using Docker:
Start the Docker container (with a hardcoded Playwright version):
docker run --rm \
  --network host \
  --ipc=host \
  -v "$(pwd)":/work/ \
  -w /work/ \
  -it mcr.microsoft.com/playwright:v1.49.0-noble \
  /bin/bash -c "npm install && bash"
Or use a script that automatically detects the Playwright version:
chmod +x run-pw-docker.sh
./run-pw-docker.sh
Now you should be in Docker, and you can generate golden screenshots for CI execution:
npx playwright test --grep "YOUR TEST" --update-snapshots
The script uses jq to parse the Playwright version from npm list. If you don’t have it:
brew install jq
If you don’t have Docker installed, a free alternative for Mac is Colima:
brew install colima
brew install docker
colima start
Pull Request Example Link to heading
When you update golden screenshots, your pull request will show image diffs alongside code changes. This allows reviewers to see exactly what visual changes are being proposed.
For example, on GitHub, you might see:
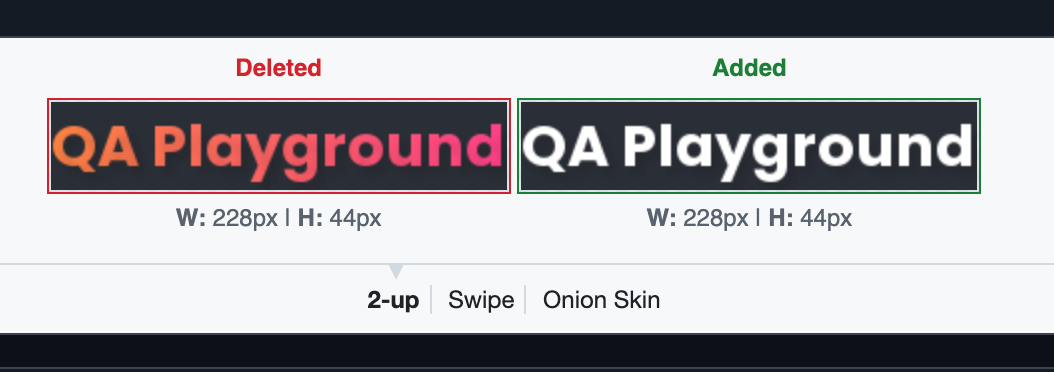
And the GitHub UI will display before/after images for easy review and approval.
Screenshot Management Strategy Link to heading
We use a specific naming convention and Git configuration to manage screenshots effectively.
Only Linux-generated screenshots are stored in the repository (used for CI), create .gitignore file with:
*.png
!*-linux.png
This configuration:
- Ignores all PNG files by default
- Explicitly tracks only screenshots with -linux.png suffix
- Ensures consistent visual testing in CI environment
This approach:
- Reduces repository size by storing only essential screenshots
- Ensures consistent visual testing in CI pipeline
- Prevents conflicts from different OS-specific renderings
Best Practices Link to heading
- Organize Screenshots: Keep a clear directory structure for screenshots, e.g., by feature or component.
- Meaningful Names: Use descriptive names for screenshot files that indicate what they represent.
- Tagging: Use tags to label visual tests, such as
@visual-regressionor@visual-test. - Review Changes: Always review screenshot changes before committing them.
- CI Setup: Ensure your CI environment has Git LFS installed and configured.
Common Issues and Solutions Link to heading
Large Repository Size
- Regularly clean up unused screenshots
- Consider using
.gitattributesto track only specific directories
Team Collaboration
- Ensure all team members have Git LFS installed locally
- Team members must run
git lfs pullafter cloning or pulling changes to download the actual screenshot files - Without Git LFS installed, team members will only see pointer files instead of actual screenshots
CI/CD Integration Install Git LFS in your CI environment:
- name: Install Git LFS
  run: |
    git lfs install
    git lfs pull
Git Hooks Integration When using Husky with Git LFS, be aware that they use different Git hooks structures. Husky may need additional configuration to work alongside Git LFS hooks. You might need to manually add Git LFS hooks to your Husky configuration:
{
  "hooks": {
    "pre-push": "git lfs push --all origin && your-other-hooks",
    "post-checkout": "git lfs checkout",
    "post-merge": "git lfs checkout"
  }
}
Conclusion Link to heading
Using Git LFS for Playwright visual test screenshots provides an efficient way to manage your test assets while keeping your repository performant. It allows team members to easily share and update baseline images while maintaining good version control practices. Please also consider using Docker for consistency.