Contents Link to heading
- Why API Testing with Playwright
- Why Schema Validation
- Test App
- Our First Schema – Login Endpoint
- Direct Playwright Request with Zod Validation
- Example 2: Using a Custom API Client with Zod
- Errors Should Also Have a Consistent Schema
- Using ApiClient in Tests
- Using Fixtures to Create API Clients
- Task: Practice Your Skills
- Summary
API Testing with Playwright and Zod: Detecting API Changes with Schema Validation Link to heading
API testing is a crucial part of modern software development. Ensuring that your backend services behave as expected not only improves reliability but also helps catch breaking changes early. In this article, we’ll explore how to combine Playwright for API testing with Zod for schema validation. All working examples are available in my repo: https://github.com/pajdekPL/playwright-api-clients-and-zod
I assume you know basic TypeScript, alias imports configuration in tsconfig.json, and you are familiar with dotenv, which is used in playwright.config.ts.
Why API Testing with Playwright? Link to heading
There are many API testing frameworks that use TypeScript, such as one of my favorites, Supertest. If you only need API testing, you can choose Supertest. However, if you want to build a “full-stack” testing framework—where you use API calls, for example, to control your application before executing UI tests and make them less flaky, then keeping API tests together with E2E UI tests can be beneficial.
Why Schema Validation? Link to heading
APIs evolve. Endpoints change, fields are added or removed, and data types may shift. Without schema validation, such changes can silently break your frontend or other consumers. By validating API responses against a schema, you:
- Catch breaking changes early: If the API response changes, your tests fail immediately.
- Document expected responses: Schemas serve as living documentation.
- Increase confidence in refactoring: You can refactor backend or frontend code, knowing that tests will catch mismatches.
- Reduce runtime errors: By ensuring data shapes are as expected, you avoid bugs caused by unexpected API responses.
Of course, you can solve most of these problems with contract testing, but that is a topic for another article.
Test App Link to heading
All examples are based on a simple application I created during the Go course at boot.dev. Here you can find the Swagger documentation.
Our First Schema – Login Endpoint Link to heading
src/api/schemas/chirpy-auth.schema.ts
// Import the 'z' object from the 'zod' library and alias it as 'schema'.
// 'zod' is a TypeScript-first schema declaration and validation library.
import { z as schema } from "zod";

// Define a Zod schema for the login request payload.
// This schema expects an object with two string properties: 'email' and 'password'.
export const ChirpyLoginSchema = schema.object({
  email: schema.string(), // The user's email address as a string
  password: schema.string(), // The user's password as a string
});

// Define a Zod schema for the login response payload.
// This schema describes the expected structure of the response returned after a successful login.
export const ChirpyLoginResponseSchema = schema.object({
  created_at: schema.string(), // Timestamp when the user was created (as an ISO string)
  email: schema.string(), // The user's email address
  id: schema.string(), // The user's unique identifier
  is_chirpy_red: schema.boolean(), // Boolean flag indicating if the user has 'chirpy red' status
  refresh_token: schema.string(), // Token used to refresh the authentication session
  token: schema.string(), // The main authentication token (JWT or similar)
  updated_at: schema.string(), // Timestamp when the user was last updated (as an ISO string)
});

// TypeScript type inferred from the ChirpyLoginResponseSchema.
// This type represents the shape of a successful login response.
export type ChirpyLoginResponse = schema.infer<
  typeof ChirpyLoginResponseSchema
>;

// TypeScript type inferred from the ChirpyLoginSchema.
// This type represents the shape of the login request payload.
export type ChirpyLogin = schema.infer<typeof ChirpyLoginSchema>;
Direct Playwright Request with Zod Validation Link to heading
Let’s start with a simple example from test-without-client.spec.ts. Here, we use Playwright’s built-in APIRequestContext to make a request, then validate the response with Zod.
import { ChirpyLoginResponseSchema } from "@api/schemas/chirpy-auth.schema";
import { ChirpyErrorSchema } from "@api/schemas/chirpy-error.schema";
import { expect, test } from "@playwright/test";
import { CHIRPY_LOGIN, CHIRPY_PASSWORD } from "playwright.config";

test.describe("Chirpy api/login", () => {
  test("POST api/login existing user", async ({ request }) => {
    const response = await request.post("/api/login", {
      data: {
        email: CHIRPY_LOGIN,
        password: CHIRPY_PASSWORD,
      },
    });

    expect(response.status()).toBe(200);

    const data = (await response.json()) as unknown;

    // Here we use the parse method on our newly created schema
    const parsedData = ChirpyLoginResponseSchema.parse(data);
    expect(parsedData.email).toBe(CHIRPY_LOGIN);
    expect(parsedData.is_chirpy_red).toBe(false);
  });

  test("POST api/login invalid credentials", async ({ request }) => {
    const response = await request.post("/api/login", {
      data: {
        email: "[email protected]",
        password: "invalid",
      },
    });

    expect(response.status()).toBe(401);

    const data = (await response.json()) as unknown;

    const parsedData = ChirpyErrorSchema.parse(data);
    expect(parsedData.error).toBe("Incorrect email or password");
  });
});
Advantages:
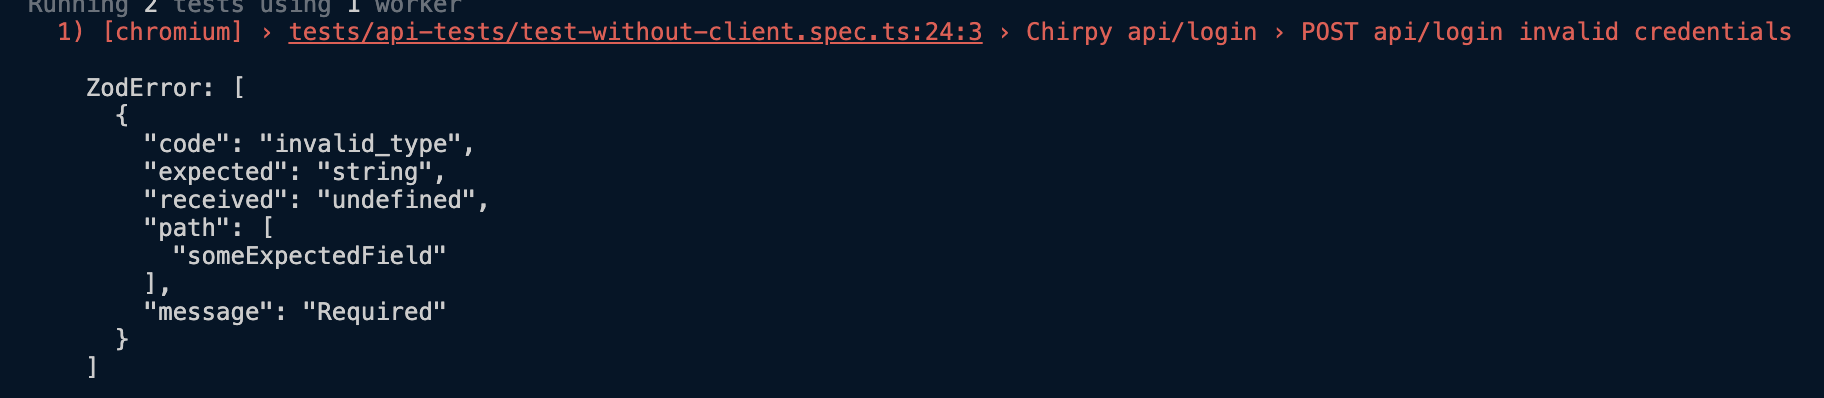
- Immediate feedback: If the API response changes, the test fails at the schema validation step. Example error:
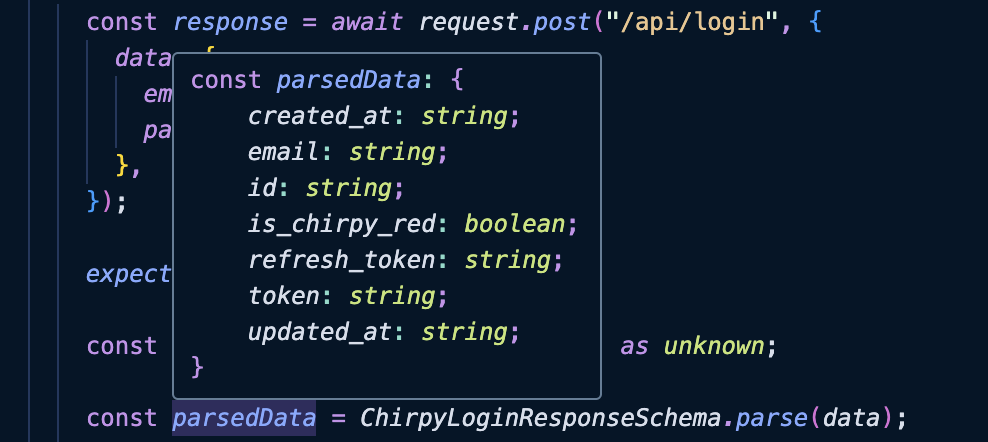
- Reusable schemas: You can share Zod schemas between backend, frontend, and tests. You can also use data from APIs more easily due to the typing.
Example of API response typing:
Example 2: Using a Custom API Client with Zod Link to heading
For more complex projects, you might encapsulate API calls in a client. Here, I created ChirpyApiClient. This approach centralizes request logic and schema validation, making tests cleaner and more maintainable. It extends the custom BaseApiClient that you can find in the repository. It adds for example test.steps that are visible in playwright reports:

api/chirpy-client.ts
import { BaseApiClient, RequestParams } from "@api/base-client";
import { FetchConfig, FetchResponse } from "@api/fetch-helper";
import {
  ChirpyLogin,
  ChirpyLoginResponse,
  ChirpyLoginResponseSchema,
} from "@api/schemas/chirpy-auth.schema";
import { APIRequestContext, expect } from "@playwright/test";
import { BASE_URL } from "playwright.config";

export class ChirpyApiClient extends BaseApiClient {
  loginPath = "/api/login";

  // Return data represented by the TypeScript type inferred from the ChirpyLoginResponseSchema.
  // The same with input data ChirpyLogin
  async login(login: ChirpyLogin): Promise<ChirpyLoginResponse> {
    const response = await this.makeRequest(this.loginPath, {
      method: "POST",
      data: login,
    });

    expect(response.status).toBe(200);

    // Validate the response using zod
    const data = ChirpyLoginResponseSchema.parse(response.data);

    return data;
  }

  // Method to make rawRequest without validation to easily test failing scenarios in our tests
  async rawRequest(
    path: string,
    options: RequestParams
  ): Promise<FetchResponse<unknown>> {
    return this.makeRequest(path, options);
  }
}

export function createChirpyApiClient(
  request: APIRequestContext,
  headers?: Record<string, string>
): ChirpyApiClient {
  const config: FetchConfig = {
    baseURL: BASE_URL,
    headers: headers ?? {},
  };

  return new ChirpyApiClient(config, request);
}
Errors Should Also Have a Consistent Schema Link to heading
It is good practice to check this as well.
src/api/schemas/chirpy-error.schema.ts
import { z as schema } from "zod";

export const ChirpyErrorSchema = schema.object({
  error: schema.string(),
});

export type ChirpyError = schema.infer<typeof ChirpyErrorSchema>;
Using ApiClient in Tests Link to heading
import { ChirpyApiClient, createChirpyApiClient } from "@api/chirpy-client";
import { ChirpyErrorSchema } from "@api/schemas/chirpy-error.schema";
import { expect, test } from "@playwright/test";
import { CHIRPY_LOGIN, CHIRPY_PASSWORD } from "playwright.config";

test.describe("Chirpy api/login", () => {
  let client: ChirpyApiClient;

  test.beforeAll(async ({ playwright }) => {
    const request = await playwright.request.newContext();
    client = createChirpyApiClient(request);
  });

  test("POST api/login existing user", async () => {
    const response = await client.login({
      email: CHIRPY_LOGIN,
      password: CHIRPY_PASSWORD,
    });

    expect(response.email).toBe(CHIRPY_LOGIN);
    expect(response.is_chirpy_red).toBe(false);
  });

  test("POST api/login invalid credentials", async () => {
    const response = await client.rawRequest(client.loginPath, {
      method: "POST",
      data: {
        email: "[email protected]",
        password: "invalid",
      },
    });

    expect(response.status).toBe(401);
    // check that the error response schema is correct
    const data = ChirpyErrorSchema.parse(response.data);
    expect(data.error).toBe("Incorrect email or password");
  });
});
Advantages:
- Centralized validation: All API responses are validated in one place.
- Cleaner tests: Tests focus on behavior, not response shape.
- Easier updates: If the API changes, update the schema in one place.
Using Fixtures to Create API Clients Link to heading
If you are not familiar with Playwright fixtures, you can read my article about it: pw-fixtures. Here you can find an example of creating an authenticated API Client in a fixture and using it in tests.
import { ChirpyApiClient, createChirpyApiClient } from "@api/chirpy-client";
import { test as base } from "@playwright/test";
import { CHIRPY_LOGIN, CHIRPY_PASSWORD } from "playwright.config";

interface ChirpyApiFixtures {
  chirpyApi: ChirpyApiClient;
}

export const test = base.extend<ChirpyApiFixtures>({
  chirpyApi: async ({ playwright }, use) => {
    const request = await playwright.request.newContext();
    const login = CHIRPY_LOGIN;
    const password = CHIRPY_PASSWORD;

    const chirpyApi = createChirpyApiClient(request);
    await chirpyApi.authenticate({
      email: login,
      password,
    });

    await use(chirpyApi);
  },
});
import { ChirpDataCreate } from "@api/schemas/chirpy-chirps.schema";
import { test } from "@fixtures/chirpy-api.fixture";
import { expect } from "@playwright/test";

test("Create and get chirp by id", async ({ chirpyApi: client }) => {
  const chirpData: ChirpDataCreate = {
    body: "Hello, world!",
    expiration_datetime: new Date().toISOString(),
  };
  let chirpId: string;

  await test.step("POST api/chirps", async () => {
    const response = await client.createChirp(chirpData);
    chirpId = response.id;
  });

  await test.step("GET api/chirps/{id}", async () => {
    const chirp = await client.getChirp(chirpId);

    expect(chirp.body).toBe(chirpData.body);
    expect(chirp.expiration_datetime).toBe(chirpData.expiration_datetime);
  });
});
Task: Practice Your Skills Link to heading
-
Clone the Repository
- Clone playwright-api-clients-and-zod and run
npm installto set up the project.
- Clone playwright-api-clients-and-zod and run
-
Add a User Creation Method
- Implement a method in the
ChirpyApiClientclass to create a new user. - Use the POST
/api/usersendpoint as described in the Swagger documentation.
- Implement a method in the
-
Create Zod Schemas
- Define new Zod schemas for the user creation request and response.
- You can use
chirpy-auth.schema.tsas a reference.
-
Build a Fixture for New User and Chirp
- Create a Playwright fixture that:
- Registers a new user,
- Authenticates the user,
- Creates a new chirp (post) as that user,
- Makes this data available to your tests.
- Create a Playwright fixture that:
-
Write a Test Using the Fixture
- Write a test (for example,
NewUserWithSingleChirp) that uses the fixture to verify the workflow.
- Write a test (for example,
-
Optional: UI Verification
- For extra practice, create a page fixture for the new user and verify in the UI that the chirp is visible using chirpy-front.
Tip: If you’re new to Playwright fixtures, check out this article on Playwright TypeScript fixtures.
Have FUN!
Summary Link to heading
Combining Playwright and Zod for API testing brings the best of both worlds: robust end-to-end testing and strict schema validation. Whether you validate responses directly in your tests or through a custom client, you gain:
- Early detection of breaking API changes
- Self-documenting tests
- Confidence in your integration points
Tip: Start with direct validation for simple cases, and move to a client-based approach as your API surface grows.
By integrating schema validation into your API tests, you ensure your application remains resilient to backend changes saving time, reducing bugs, and increasing confidence in your releases. You can create your API clients in fixtures and use them in your tests.